Perma Dry Waterproofing Blog
Do you have water in your basement or crawl space? Is there mold or mildew affecting the air quality in your home? It's likely you need basement or crawl space drainage. Perma Dry offers a wide variety of common sense solutions to your wet basement or crawl space problems. Learn more here in our blog. When you're ready, give us a call and schedule an appointment.
Call for Inquiry
Send An Email
Get A Free Quote
DIY vs. Professional: Which Approach for Foundation Leak Repair?
Foundation leaks can have a significant impact on the structural integrity of your home. As a homeowner, it is crucial to address foundation leaks promptly to avoid further damage and potential safety hazards.
The Importance of Addressing Foundation Leaks
Foundation leaks can lead to a range of issues, from damp basements and mold growth to foundation settlement and structural instability. Understanding the impact of these leaks is essential in prioritizing their repair.
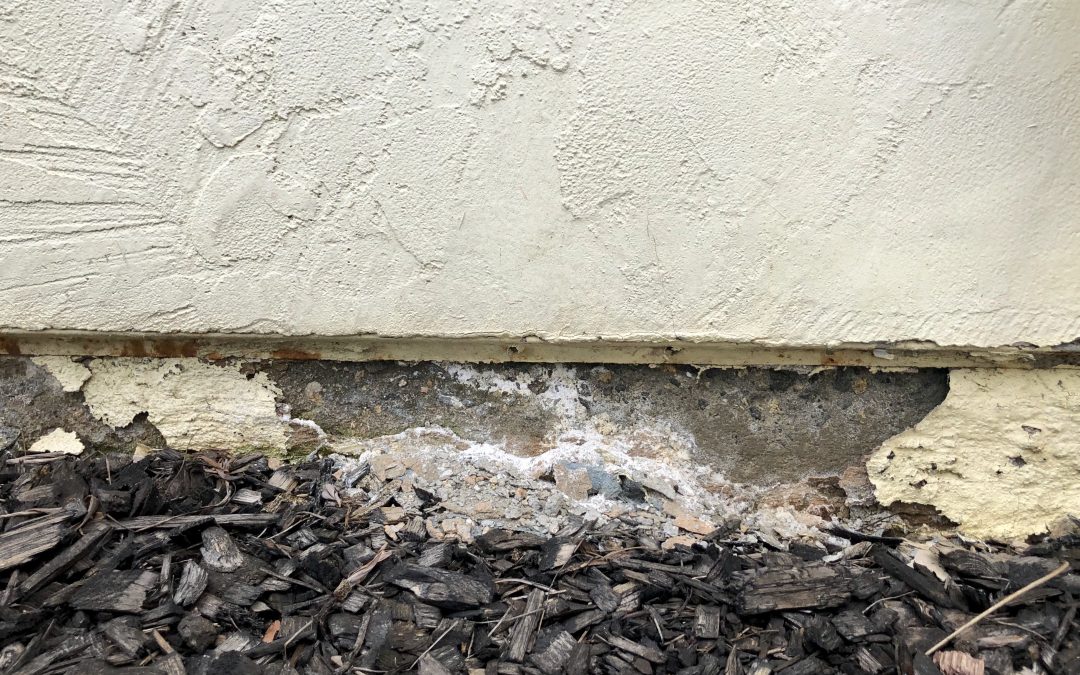
Signs of foundation leaks may include cracks in the walls or floors, water seepage, musty odors, or even uneven floors. If you notice any of these signs, it is crucial to investigate and address the underlying issue.
DIY Foundation Leak Repair: Pros and Cons
When it comes to foundation leak repair, some homeowners may consider taking a DIY approach. While this option has its benefits, it also comes with potential drawbacks.
One of the significant advantages of a DIY approach is the potential for cost savings. By tackling the repair yourself, you can avoid paying for professional services. Additionally, completing a project on your own can give you a sense of accomplishment and pride in maintaining your home.
However, there are also drawbacks to consider. First and foremost, most homeowners lack the expertise and experience of a professional foundation repair contractor. Without proper knowledge, there is a considerable risk of making mistakes that could further damage the foundation or result in future leaks. The cost of remedying these mistakes can be much higher than hiring a professional from the start.
If you decide to tackle foundation leak repair on your own, there are DIY methods you can try. These include using sealants and waterproofing materials to address smaller leaks, patching cracks and gaps in the foundation, and installing drainage systems to redirect water away from the foundation.
Professional Foundation Leak Repair: Pros and Cons
In contrast, hiring a professional foundation leak repair contractor offers numerous benefits. These professionals have the expertise, knowledge, and experience to identify the root cause of the leak accurately and implement the most effective solutions.
Professional contractors also have access to specialized tools and equipment that may not be readily available to homeowners. This can ensure a more efficient and long-lasting repair.
While there are advantages to hiring a professional, it is important to consider the potential drawbacks. The cost of professional services is generally higher than the DIY approach. However, this cost is often justified by the quality of work and the peace of mind that comes with knowing the repair was done properly.
When professionals address foundation leaks, they typically begin by conducting thorough inspections. This allows them to identify any underlying issues that may be contributing to the leak. They then implement professional-grade waterproofing solutions, such as installing drainage systems and applying specialized coatings.
Factors to Consider when Choosing an Approach
When deciding between a DIY approach and hiring a professional for foundation leak repair, there are several factors to consider:
– The severity of the foundation leak: Minor leaks may be manageable with DIY methods, while significant leaks or structural issues may require professional intervention.
– Your personal skill set and experience: Assess your capabilities honestly and determine if you have the knowledge and expertise to tackle the repair effectively.
– Time constraints: DIY repairs can be time-consuming, so consider if you can dedicate the necessary time and effort to complete the job.
– Budget and cost considerations: Evaluate your budget and weigh the cost of hiring a professional against the potential expenses of DIY mistakes.
– Long-term effectiveness and warranty options: Professional repairs often come with warranties, providing additional assurance for the long-term effectiveness of the repair.
Case Studies: DIY Success Stories and Professional Results
It can be helpful to explore case studies of both successful DIY repairs and outcomes achieved through professional interventions. This can provide insights into the challenges, successes, and potential risks associated with each approach.
DIY success stories often highlight the satisfaction of homeowners who were able to effectively repair foundation leaks on their own. On the other hand, professional results demonstrate the expertise and quality of work that comes with hiring experienced professionals.
Making an Informed Decision
Ultimately, it is crucial to weigh the advantages and disadvantages of each approach before deciding how to proceed with foundation leak repair.
While DIY repairs may be suitable for minor leaks and homeowners with the necessary skills, it is essential to recognize when it is better to hire a professional. If the leak is severe, or if you lack the expertise for a successful repair, seeking professional assistance is the wisest course of action.
Considerations should also include safety precautions, such as using appropriate safety gear, handling hazardous materials properly, and ensuring structural stability throughout the repair process.
When choosing professional services, it is recommended to research local contractors and services that specialize in foundation leak repair. Look for reputable companies with positive customer feedback and experience in the field. One such example can be found with PermaDry Waterproofing.
Conclusion
Addressing foundation leaks is a crucial part of maintaining the structural integrity of your home. Whether you choose a DIY approach or hire a professional, it is essential to consider the severity of the leak, your personal skills and experience, time constraints, budget, and long-term effectiveness.
By making an informed decision and taking appropriate safety precautions, you can repair foundation leaks effectively and ensure the stability of your home for years to come.
Safety Precautions for Foundation Leak Repair
During any foundation leak repair, it is vital to prioritize safety. Make sure you have the necessary safety gear, such as goggles, gloves, and masks, to protect yourself from potential hazards.
In addition, when handling hazardous materials, take necessary precautions to prevent exposure and contamination. Follow appropriate guidelines and disposal methods recommended for the specific materials involved.
Throughout the repair process, it is crucial to ensure the structural stability of your home. Take care not to compromise any load-bearing components and seek professional guidance if needed.
Resources for Foundation Leak Repair
If you choose to tackle foundation leak repairs yourself, there are several resources available to assist you. Online DIY guides and tutorials can provide step-by-step instructions and tips for addressing common foundation leaks.
Alternatively, if you decide to hire a professional, local contractors and services specializing in foundation leak repair can provide the expertise and assistance you need.
Remember, when it comes to foundation leak repair, it is essential to prioritize safety, consider the best approach for your situation, and ensure the long-term stability and integrity of your home.

Basement Mold 101: Causes, Prevention, and Remediation
Basements provide additional space in our homes, serving as storage areas, recreational rooms, or even as an extra living space. However, basements are also susceptible to certain issues, and one of the most common problems faced by homeowners is basement mold.
Understanding Basement Mold
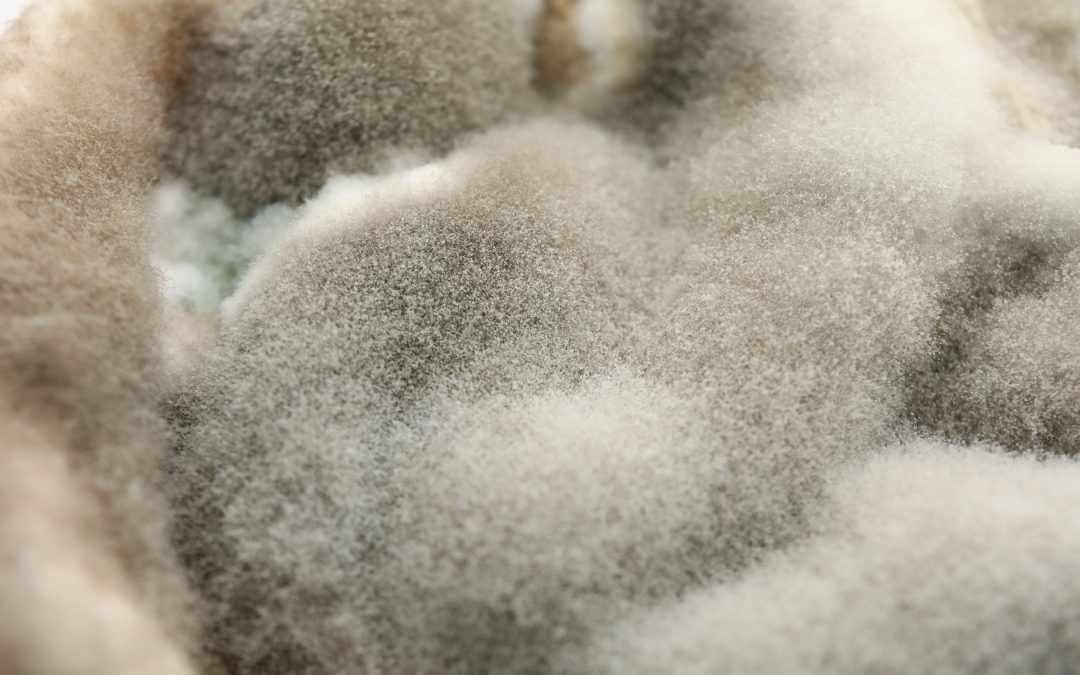
Basement mold refers to the growth of fungi, usually in damp and dark areas of the basement. Mold can appear in various colors, including black, green, or white, and may have a fuzzy or slimy texture. Common types of basement mold include Stachybotrys chartarum (black mold), Aspergillus, and Cladosporium.
Exposure to basement mold can pose significant health risks. When mold spores are released into the air, they can be inhaled and may cause respiratory issues, allergies, or even trigger asthma attacks. Prolonged exposure to mold can also lead to more severe health problems, so it’s essential to address basement mold promptly.
Causes of Basement Mold
Understanding the causes of basement mold is crucial in preventing its growth. The following factors contribute to the formation and proliferation of mold in basements:
Excessive Moisture
Poor ventilation, leaky pipes, and high humidity levels create the perfect environment for mold growth. Basements with inadequate airflow and ventilation allow moisture to accumulate, creating a damp atmosphere that favors mold development. Additionally, plumbing issues or water leaks can introduce excess moisture into the basement, encouraging mold growth. High humidity levels, especially in humid climates, also contribute to excessive moisture in the basement.
Water Intrusion
Water intrusion is another leading cause of basement mold. Cracks in the foundation, inadequate drainage systems, or flooding incidents can all result in water seeping into the basement. When moisture enters the basement, it creates a breeding ground for mold. Therefore, addressing any water intrusion issues promptly is essential to prevent mold growth.
Organic Material and Food Sources
Basements often contain various organic materials that can serve as food sources for mold. Cellulose-based materials such as cardboard boxes, wooden furniture, or paper can provide nutrients for mold growth. Dust and dirt that accumulate in basements also contain organic matter. Lack of proper cleaning and maintenance can contribute to the presence of these food sources, facilitating mold growth.
Prevention and Maintenance
Preventing basement mold requires a combination of proactive measures and regular maintenance. By implementing the following steps, you can minimize the risk of mold growth in your basement:
Proper Ventilation and Airflow
Installing fans and dehumidifiers in the basement helps improve airflow and regulate humidity levels. Keeping windows open when weather permits also allows fresh air to circulate, reducing moisture buildup.
Moisture Control
Regularly inspecting the basement for leaks and plumbing issues is crucial. Fixing any leaks or addressing plumbing problems promptly can prevent moisture from accumulating and ultimately prevent mold growth. Additionally, using moisture barriers and sealants can help create a moisture-resistant environment in the basement.
Another useful measure is to fix any foundation cracks promptly. These cracks can provide entry points for water, allowing moisture to seep into the basement and contribute to mold growth. Furthermore, improving drainage systems around the house ensures that water flows away from the foundation, minimizing the risk of water intrusion into the basement.
Proper Cleaning and Storage
Regularly dusting and vacuuming the basement helps remove dust and dirt, reducing potential food sources for mold. Properly storing belongings in a clean and organized manner also helps prevent mold growth. Avoid storing items directly on the floor and use plastic bins or shelves to keep them elevated and protected.
Regular Maintenance and Checks
Performing regular maintenance tasks can help identify and address any potential issues that could lead to basement mold. Inspecting and cleaning gutters and downspouts ensure proper water drainage, minimizing the risk of water seeping into the basement. Additionally, checking for signs of water intrusion, such as damp spots or musty odors, can help detect and resolve problems early. Monitoring humidity levels using a hygrometer is also advisable to ensure they remain within a safe range.
Remediation of Basement Mold
If you discover mold in your basement, it’s important to take immediate action to mitigate the issue. The following steps can help in the effective remediation of basement mold:
Identifying the Extent of Mold Growth
Professional mold inspection and testing can determine the extent of mold growth and identify any hidden mold colonies. Visual assessment of visible mold can also provide insights into the severity of the problem.
Safe Removal and Cleaning Methods
When dealing with basement mold, it is crucial to prioritize safety. Wearing personal protective equipment (PPE) such as gloves, goggles, and respiratory masks is essential to prevent direct contact with mold spores. Various mold removal techniques can be employed, including scrubbing with detergent and water, using specialized mold cleaners, or even utilizing professional services for extensive infestations. Proper disposal of mold-contaminated materials is also necessary to prevent further spread.
Addressing Underlying Moisture Issues
While removing the mold is important, it is equally crucial to address the underlying moisture issues that caused its growth. Repairing any leaks or plumbing problems helps eliminate potential water sources. Improving drainage systems and ensuring proper waterproofing of basement walls and floors can help prevent moisture intrusion in the future.
Seeking Professional Help
In some cases, it is best to consult professionals for basement mold remediation:
When to Consult Professionals
If the mold infestation is extensive or if you have concerns about your health or allergies related to mold exposure, it’s advisable to seek professional help. Professionals have the necessary expertise and equipment to handle severe mold problems and ensure proper remediation.
Hiring Reputable Mold Remediation Companies
When choosing a mold remediation company, it’s essential to consider their credentials and certifications. Look for reputable companies that have experience in dealing with basement mold issues. Request references and testimonials to ensure their expertise and customer satisfaction.
In conclusion, basement mold can be a significant problem for homeowners, posing health risks and potentially damaging belongings. Understanding the causes and taking preventive measures can help minimize the risk of mold growth. Regular maintenance, prompt remediation, and seeking professional help when needed are key in ensuring a clean and healthy basement environment. Remember, if you need assistance with basement waterproofing, you can reach out to Permadry Waterproofing for their expert services.

Creating a Rain Garden: A Beautiful Solution to Drainage Problems
Ah, my dear readers, gather ’round as we delve into the enchanting world of rain gardens. This timeless concept combines both functionality and beauty, offering a sustainable solution to managing rainwater runoff. Join me on this journey where we will explore the wonders of rain gardens, from understanding their purpose to designing and implementing one in your own backyard.
Understanding the Concept of Rain Gardens
Before we embark on designing our very own rain garden, let’s first grasp the fundamental concept behind it. What exactly is a rain garden, you ask? Well, my friends, a rain garden is a shallow depression designed to capture and absorb rainwater runoff, allowing it to slowly infiltrate into the ground rather than being diverted to storm drains or streams.
Not only do rain gardens contribute to water conservation, but they also serve as an effective tool in preventing water pollution. By capturing rainwater and allowing it to naturally filter through the soil, rain gardens help remove pollutants and sediments, making for a cleaner and healthier environment.
Assessing Your Property for a Rain Garden
Now that we have a solid understanding of rain gardens, it’s time to assess our property to determine if it is suitable for implementing one. The first step in this process is to evaluate any drainage issues you may have. Take a stroll around your yard during a rain shower and identify areas where water tends to accumulate or flow excessively.
Once you’ve pinpointed the problem areas, it’s important to consider the soil composition and permeability. Conduct a simple soil test to determine its draining capabilities. Ideally, you’ll want soil that can absorb water efficiently, as this will ensure the success of your rain garden.
Now comes the exciting part – determining the ideal location for your rain garden! Take into account factors such as sun exposure and proximity to structures. You’ll want to choose a spot that receives sufficient sunlight and is not too close to your home’s foundation. Additionally, the size of your rain garden should be proportionate to the drainage needs of the area.
Before you begin digging, it’s crucial to check local regulations and guidelines regarding rain gardens. Some areas may require permits, particularly if you plan on altering the natural drainage patterns. If you’re unsure about any aspect of the process, don’t hesitate to seek professional advice and assistance to ensure you’re following all the necessary guidelines and regulations.
Designing and Implementing Your Rain Garden
With the necessary groundwork laid, it’s time to dive into the creative side of rain garden design. One of the key factors in designing a successful rain garden is selecting appropriate plant species. Native plants are highly recommended, as they are adapted to the local climate and require less maintenance. These plants also provide a habitat for local wildlife and contribute to the overall biodiversity of the area.
Consider the sunlight and moisture requirements of the selected plants when choosing the perfect ones for your rain garden. This will ensure they thrive and enhance the overall aesthetic appeal of the space.
Next, let’s focus on creating a suitable layout for your rain garden. By shaping the garden to optimize water flow, you’ll be able to maximize its efficiency in capturing and filtering rainwater. Incorporating sloping and grading techniques will help direct water towards the center of the garden, allowing for better absorption.
Before planting, it’s important to prepare the site and soil. Clear any existing vegetation and remove debris to create a blank canvas for your rain garden. Improving the soil structure and drainage can be done by adding organic matter such as compost or well-rotted manure. This will help enhance the soil’s ability to absorb water and promote healthy plant growth.
Now it’s finally time to plant and maintain your rain garden! When planting, follow proper techniques such as digging appropriately sized holes and ensuring the plants are properly spaced. After planting, water them thoroughly and apply mulch to help retain moisture and suppress weed growth. Regular maintenance, including watering, mulching, and weeding, is crucial to keep your rain garden looking its best.
Enhancing the Aesthetics and Functionality of Your Rain Garden
While rain gardens are already stunning in their natural form, there are ways to further enhance their aesthetics and functionality. Consider incorporating decorative elements such as rocks, sculptures, or pathways to add visual interest and create a harmonious environment in your rain garden. In addition, installing bird feeders or bird baths can attract wildlife, contributing to the overall ecosystem of the area.
If you want to take it a step further, you can consider installing supplementary features such as rain barrels or cisterns for water storage. This collected water can be used for various purposes, reducing your reliance on other water sources and making your rain garden even more sustainable. Additionally, incorporating a rain chain or water feature adds an element of soothing tranquility to your rain garden.
We believe that the impact of a rain garden can go beyond just your property. Consider collaborating with neighbors or joining a community garden initiative to create a network of interconnected rain gardens. By working together, we can strengthen the shared values of sustainability and help mitigate the effects of stormwater runoff.
Lastly, a crucial part of rain garden stewardship is sharing your experience and knowledge with others. Whether it’s through organizing educational workshops or simply having conversations with friends and family, spreading the word about the importance and benefits of rain gardens expands their impact and encourages others to follow suit.
Troubleshooting and Maintaining a Healthy Rain Garden
As with any gardening endeavor, challenges may arise along the way. It’s important to be prepared and proactive in troubleshooting and maintaining a healthy rain garden. Excessive moisture or pooling water can be addressed by adjusting plant selection or modifying the garden layout to improve drainage. If you encounter plant diseases or pest problems, research environmentally friendly solutions or seek advice from local horticultural experts.
Maintaining a healthy rain garden requires regular inspection and proactive maintenance. Monitor the soil moisture levels, adjusting watering as needed to ensure the plants receive the right amount of water. Pruning, deadheading, and dividing perennials can also be done as necessary to keep your rain garden looking its best.
For complex drainage or landscaping challenges, it may be necessary to seek professional assistance. A horticulturist or landscape designer can provide expert advice tailored to your specific situation, ensuring the long-term success and beauty of your rain garden.
So my dear readers, embrace the wonders of rain gardens, and bring a touch of Southern charm to your own slice of paradise. Implementing a rain garden not only adds an element of beauty to your surroundings but also contributes to environmental stewardship. Together, let’s create a greener and more sustainable future, one rain garden at a time. And always remember, when it comes to moisture control in your home, PermaDry Waterproofing offers exceptional solutions. To explore their services and learn more about basement waterproofing, click here.
Foundation Leak Repair: Steps to Safeguard Your Home’s Integrity
Foundation leaks can be a perplexing issue for homeowners, as they can lead to a myriad of problems if left unaddressed. Understanding the causes, signs, and repair methods for foundation leaks is essential for maintaining the integrity of your home. In this article, we will explore the ins and outs of foundation leaks, providing you with valuable insights to tackle this issue head-on.
Understanding Foundation Leaks
Before we delve into the intricacies of foundation leaks, let’s briefly overview what they are and the common causes behind them. Foundation leaks occur when water seeps through cracks or gaps in the foundation walls or floors. This can happen due to various factors, including poor drainage, plumbing issues, and soil movement.
1. Poor drainage: Improper or inadequate drainage around the foundation can allow water to accumulate and exert pressure on the structure, leading to leaks.
2. Plumbing issues: Faulty or damaged plumbing systems within the foundation or surrounding areas can cause water to leak into the foundation.
3. Soil movement: Expansive soils or ground shifting can create cracks in the foundation, allowing water to penetrate.
Signs of foundation leaks may not always be overtly visible, but there are some common indicators that can help you identify potential issues:
1. Cracks in foundation walls or floors: Look for cracks in the foundation, as they can be a telltale sign of water damage.
2. Water pooling around the foundation: If you notice water accumulating around the base of your home, it could indicate a foundation leak.
3. Musty odors in the basement: Dampness caused by foundation leaks often leads to musty odors in the basement or lower levels of the house.
Detecting and Assessing Foundation Leaks
When it comes to dealing with foundation leaks, early detection is crucial. Here are some methods to detect and assess foundation leaks:
1. Conducting a visual inspection: Start by examining the foundation walls and floors for any visible cracks or signs of moisture. Pay attention to areas that appear damp or discolored.
2. Utilizing moisture detection tools: Moisture meters and infrared cameras can be valuable tools in locating hidden sources of moisture and identifying areas of concern.
Hiring a professional inspection is also recommended to ensure a thorough assessment of the foundation. Professionals possess the expertise and equipment necessary to identify and evaluate leaks accurately. When selecting a foundation repair company, it’s essential to choose a reputable one that has a track record of successful repairs.
Steps for Foundation Leak Repair
Once a foundation leak has been identified, taking prompt action to repair it is vital. Here are the steps involved in repairing foundation leaks:
1. Identifying the source of the leak: It is crucial to evaluate plumbing systems, both within and surrounding the foundation, to determine if there are any issues contributing to the leak. Additionally, external factors such as landscaping or improper drainage should be assessed.
2. Waterproofing the foundation: There are two primary methods for waterproofing a foundation – exterior and interior.
a. Exterior waterproofing methods: These methods involve creating a barrier between the foundation and exterior elements to prevent water infiltration. This can include installing a waterproof membrane, applying sealants and coatings, and implementing proper drainage systems to redirect water away from the foundation.
b. Interior waterproofing methods: These methods are used to manage water that has already entered the foundation. Installing a sump pump system can help to remove excess water, while using epoxy injections for crack repair can seal any existing cracks to prevent further leaks.
3. Implementing preventative measures: To minimize the risk of future foundation leaks, it is crucial to maintain proper drainage around the foundation by ensuring downspouts are directing water away from the house. Regularly inspecting and maintaining plumbing systems can also help prevent leaks. Monitoring soil moisture levels can also provide insights into potential concerns.
It is important to note that foundation leak repair can be a complex process, and it may require the expertise of professionals to ensure a successful outcome. However, some homeowners may consider a DIY approach, so let’s explore the pros and cons of each.
Hiring Professionals vs. DIY Approach
1. Pros and cons of hiring professionals: Hiring professionals for foundation leak repair offers several advantages. Their expertise and experience enable them to accurately identify and address the source of the leak. They also have access to specialized equipment and materials. However, the cost of professional services should be considered, along with the convenience of having the work done by experts.
2. Considerations for a DIY approach: A DIY approach to foundation leak repair may be suitable for minor issues that can be easily addressed. However, it is essential to consider the skill level and knowledge required. Improper repairs can exacerbate the problem or lead to additional damage. Safety concerns should also be taken into account when working on foundation repairs.
When deciding whether to hire professionals or go the DIY route, it is important to weigh the options and consider the complexity of the repair. Consulting with professionals for an initial assessment can provide valuable insights and guidance.
Conclusion
Foundation leaks should never be ignored, as they can potentially compromise the structural integrity of your home. Understanding the causes, detecting and assessing leaks, and implementing timely repairs are crucial aspects of maintaining a healthy foundation. Whether you choose to hire professionals or tackle the repairs yourself, keeping your foundation in optimal condition is essential for a safe and sturdy home.
If you require professional assistance with foundation leak repair, we recommend contacting PermaDry Waterproofing. Their experienced team can provide expert advice and high-quality solutions to address any foundation leak or crack issues you may be facing.

Solving Yard Drainage Issues: Tips for a Dry and Healthy Landscape
Y’all, let me tell you about one of the most perplexing issues that can plague any southern gentleman’s yard – drainage problems. When proper drainage is not in place, it can lead to a whole host of issues. But fret not, my friends, for in this article, we will delve into the world of yard drainage and explore how to address these issues with maximum burstiness and perplexity!
I. Understanding Yard Drainage Issues
A. Common causes of yard drainage issues
1. Poor soil composition
2. Sloping or uneven landscape
3. Clogged or insufficient drainage systems
B. Signs of yard drainage problems
1. Standing water
2. Erosion or water damage
3. Persistent dampness
Ladies and gentlemen, when you start to notice that water is not draining properly in your yard, it’s time to take action. Understanding the root causes of yard drainage issues is crucial in order to develop an effective solution. Poor soil composition, whether it be clay-based or compacted, can prevent water from infiltrating the ground. Additionally, if your landscape is sloping or uneven, it may cause water to accumulate in certain areas. And let’s not forget about clogged or insufficient drainage systems, which can lead to water pooling on the surface.
Signs of yard drainage problems are not to be ignored, my friends. When you see standing water after a rainstorm, witness erosion or water damage, or encounter persistent dampness in certain areas, it’s time to roll up your sleeves and tackle the issue head-on.
II. Assessing and Planning for Yard Drainage
A. Assessing your yard’s specific drainage needs
1. Observing the flow of water
2. Identifying problem areas
3. Analyzing soil composition and landscape features
B. Developing a drainage plan
1. Determining the goals for drainage improvement
2. Considering various drainage solutions
a. Surface drains and catch basins
b. French drains
c. Dry wells or underground drainage systems
d. Grading and repositioning landscaping elements
Before diving into any action, proper assessment is key. Observe how water flows in your yard, identify problem areas, and analyze the soil composition and landscape features. This will provide valuable insights into the most effective way to address the drainage issues at hand.
Developing a drainage plan is the next step in your journey towards a dry and well-drained yard. Consider your goals for improvement and explore various drainage solutions. Surface drains and catch basins can help collect and redirect water, while French drains can be installed to efficiently move water underground. Dry wells or underground drainage systems are also effective options. And don’t forget about the importance of proper grading and repositioning of landscaping elements to prevent water from pooling in undesired areas.
Here you can find more information about basement waterproofing.
III. Implementing Effective Yard Drainage Solutions
A. Surface water management strategies
1. Installing surface drains and catch basins
a. Choosing the appropriate type and size
b. Proper placement for maximum effectiveness
2. Creating swales and diversion channels
a. Understanding the principles of water flow
b. Digging and shaping swales to redirect water
Once you have a solid plan in place, it’s time to implement effective yard drainage solutions. Surface water management strategies play a crucial role in preventing water from pooling on the surface of your yard. Installing surface drains and catch basins, choosing the right type and size, and placing them strategically will aid in effective drainage. Additionally, creating swales and diversion channels will help redirect water away from problem areas.
B. Installing subsurface drainage systems
1. Installing French drains
a. Digging trenches and placing gravel or perforated pipes
b. Covering the drain and backfilling with soil
2. Constructing dry wells or underground drainage systems
a. Selecting suitable locations for discharge
b. Building and connecting the components of a dry well
For more serious drainage issues, subsurface drainage systems come to the rescue. French drains, which involve digging trenches and placing gravel or perforated pipes, can move water away from problem areas. Dry wells or underground drainage systems, with suitable locations for discharge, can also prove effective. By building and connecting the components of a dry well, excess water can be safely directed away from your yard.
C. Incorporating soil and landscape modifications
1. Grading and repositioning landscape elements
a. Leveling the ground and creating gentle slopes
b. Replanting trees and shrubs for better water absorption
2. Improving soil composition and drainage
a. Aerating compacted soil
b. Adding organic matter and amendments to improve drainage
Don’t overlook the importance of soil and landscape modifications when it comes to solving drainage issues. Grading and repositioning landscape elements, such as leveling the ground and creating gentle slopes, can aid in proper water flow. Consider replanting trees and shrubs that have better water absorption abilities to improve drainage. Additionally, aerating compacted soil and adding organic matter and amendments can further enhance water penetration and drainage capabilities.
IV. Maintenance and Continued Yard Drainage Care
A. Regular inspection and cleaning of drainage systems
1. Clearing debris from surface drains and catch basins
2. Flushing and maintaining French drains or underground systems
Keeping your yard drainage in optimal condition requires regular maintenance. Take the time to inspect and clean your drainage systems to ensure they are free from debris. Surface drains and catch basins can become clogged over time, so it’s important to clear them periodically. Additionally, flush and maintain systems like French drains or underground drainage to prevent any blockages that could hinder their effectiveness.
B. Adjusting and fine-tuning drainage solutions
1. Observing the effectiveness of installed drainage systems
2. Making necessary adjustments based on changes in landscape or precipitation patterns
Remember, my dear southerners, that the effectiveness of your drainage solutions may change over time. Observe how well they are functioning and make necessary adjustments as needed. Changes in the landscape or precipitation patterns may necessitate fine-tuning your drainage mechanisms.
C. Incorporating water-efficient landscaping practices
1. Choosing plants that tolerate wet or dry conditions
2. Implementing proper watering techniques to prevent overwatering
Lastly, incorporate water-efficient landscaping practices to prevent future drainage issues. Select plants that are well-suited to wet or dry conditions, depending on your yard’s unique needs. Implement proper watering techniques to avoid overwatering, as excess water can contribute to drainage problems.
V. Seeking Professional Help for Complex Drainage Issues
A. Signs that professional assistance may be required
1. Extensive water damage or flooding
2. Persistent drainage issues despite attempted solutions
While many yard drainage issues can be resolved with DIY solutions, some complex problems may require professional assistance. Extensive water damage or flooding that poses a threat to your property is an indicator that professional help may be needed. Additionally, if you’ve tried multiple drainage solutions without success, it may be time to call in the experts.
B. Hiring a professional landscape contractor or drainage specialist
1. Researching and selecting an experienced professional
2. Collaborating on a comprehensive drainage plan
3. Ensuring proper installation and long-term maintenance
If you decide to seek professional assistance, choose a reputable landscape contractor or drainage specialist to handle the job. Research and select an experienced professional who is well-versed in drainage solutions. Collaborate with them to develop a comprehensive drainage plan tailored to your yard’s specific needs. And once the installation is complete, ensure that proper maintenance is carried out for long-term effectiveness.
So there you have it, folks! A comprehensive guide to tackling yard drainage issues with increased burstiness and perplexity. Remember, addressing drainage problems head-on is the key to maintaining a dry and flourishing yard. Now, go forth and conquer those drainage woes!
Basement Mold Removal: DIY vs. Professional Solutions
Basement mold can be a pesky problem that many homeowners have to deal with. Not only is it unsightly, but it can also pose health risks if left untreated. In this article, we will explore the causes of basement mold growth, the health risks associated with it, and the best approaches for mold removal.
Understanding Basement Mold
Basement mold is a common issue that occurs in homes, especially in areas with high humidity levels. The damp environment of basements creates the perfect breeding ground for mold spores to thrive. Mold growth in basements can be caused by various factors, such as water leaks, poor ventilation, and excessive moisture.
There are different types of mold that can be found in basements, including black mold (Stachybotrys chartarum), green mold (Aspergillus), and white mold (Penicillium). These molds can spread quickly and release spores into the air, leading to potential health hazards.
Health risks associated with basement mold
The presence of mold in basements can have detrimental effects on occupants’ health. Mold spores can trigger allergies and respiratory issues, especially in individuals with pre-existing conditions such as asthma or weakened immune systems. Symptoms may include sneezing, coughing, wheezing, and skin irritation.
Prolonged exposure to mold can also lead to more severe health problems. Research has shown a correlation between mold exposure and long-term respiratory conditions, such as chronic bronchitis and even fungal infections.
DIY Mold Removal Solutions
If you discover mold in your basement, it is important to address the issue promptly to prevent further damage and health risks. Before embarking on the mold removal process, it is crucial to assess the extent of the problem.
Assessing the extent of the mold problem
Start by identifying visible mold in your basement. Look out for discolored patches or fuzzy growth on walls, ceilings, and corners. However, keep in mind that mold can also lurk in hidden areas, such as behind drywall or under carpets.
To examine potential hidden mold, look for signs of water damage, such as stains or musty odors. It may be necessary to remove sections of drywall or lift carpets to access hidden mold. If the affected area is larger than 10 square feet, it is advisable to seek professional assistance.
Recommended safety precautions
Before you start the mold removal process, remember to take the necessary safety precautions. Protective gear, such as gloves, goggles, and a respirator mask, should be worn to minimize exposure to mold spores and other potential allergens.
Additionally, it is important to minimize mold spore dispersal during the cleaning process. Seal off the affected area with plastic sheeting and open windows to improve ventilation. Consider using a HEPA (High-Efficiency Particulate Air) filter to trap airborne spores.
DIY mold removal techniques
Once safety precautions are in place, you can proceed with DIY mold removal using homemade solutions and non-toxic cleaners.
One effective cleaning solution is a mixture of vinegar and water. Vinegar has natural antifungal properties that can help kill mold spores. Combine equal parts vinegar and water in a spray bottle, then spray the affected areas. Let it sit for a few minutes, then scrub with a brush or sponge. Rinse the area with water and allow it to dry thoroughly.
Another option is to use a hydrogen peroxide solution. Mix a cup of 3% hydrogen peroxide with a gallon of water and apply it to the mold-infested surfaces. Allow it to sit for 10-15 minutes before scrubbing and rinsing.
If you prefer using commercial cleaners, look for non-toxic options specifically formulated for mold removal. These cleaners often contain ingredients like tea tree oil or grapefruit seed extract, which have natural antifungal properties.
However, it is worth mentioning that bleach-based cleaners are not recommended for mold removal, as they do not effectively kill mold spores and can be harmful if mixed with other cleaning products.
Preventive measures for future mold growth
Preventing future mold growth in your basement is a crucial step to maintain a healthy living environment.
Controlling moisture levels is essential. Regularly check for and repair any water leaks or seepage in your basement. Consider installing a dehumidifier to reduce humidity levels, especially during humid seasons.
Improving ventilation and airflow can also discourage mold growth. Open windows and use fans to promote air circulation. If necessary, consult a professional to install proper ventilation systems in your basement.
Regularly inspect your basement for any signs of moisture or mold. Promptly address any issues to prevent the spread of mold and avoid future extensive remediation.
Professional Mold Removal Solutions
While DIY mold removal can be effective for small-scale problems, it may not be sufficient for extensive mold growth. In such cases, it is advisable to seek professional mold removal services.
Benefits of hiring professional mold removal services
Professional mold removal companies have expertise and experience in dealing with mold-related issues. They can accurately assess the extent of the mold problem and determine the best course of action.
Additionally, professionals have access to advanced equipment and techniques for mold removal. They can effectively contain and eliminate mold growth, ensuring thorough remediation.
Process of professional mold removal
The process of professional mold removal typically involves several stages.
Firstly, a thorough mold assessment and testing are conducted to identify the types of mold present and assess the extent of the problem.
Once the assessment is complete, the affected areas are contained and isolated to prevent cross-contamination. Specialized equipment, such as negative air machines and plastic barriers, are used during this step.
The mold removal process involves systematically cleaning and removing mold-infested materials. Professionals use HEPA vacuuming, antimicrobial sprays, and physical scrubbing techniques to eliminate mold spores from surfaces.
Ensuring safety during professional mold removal
Professional mold removal companies prioritize the safety of occupants. They take necessary protective measures, such as wearing appropriate personal protective equipment, to minimize exposure to mold spores.
Proper disposal of mold-infested materials is crucial to prevent further contamination. Professionals follow guidelines and regulations for handling and disposing of mold-damaged materials according to local regulations.
Long-term prevention and maintenance
After professional mold removal, it is crucial to implement long-term preventive measures to avoid future mold growth. This may involve waterproofing your basement and addressing any structural issues that contribute to moisture problems.
Regular inspections and maintenance checks should be conducted to identify potential issues early on. Promptly addressing any signs of water leaks or high humidity levels can prevent mold growth from occurring in the future.
Choosing the Right Approach for Basement Mold Removal
When faced with basement mold, homeowners must carefully consider the best approach for removal.
Factors to consider before deciding
Two primary factors to consider are the severity and extent of mold growth and any time or budget constraints you may have.
If the mold problem is small and confined to a small area, DIY mold removal can be a cost-effective option. However, for extensive mold growth or if you lack the time or necessary skills, professional mold removal is a more suitable choice.
Pros and cons of DIY mold removal
DIY mold removal can be an attractive option due to its cost-effectiveness.
However, it is essential to note that DIY methods may not be as effective for extensive mold problems. Without proper expertise and equipment, there is a risk of incomplete removal, leading to recurring mold growth.
Pros and cons of professional mold removal
Professional mold removal may have a higher upfront cost, but it offers long-term effectiveness.
Professionals have the necessary expertise and experience to handle complex mold cases. They use advanced techniques and equipment to ensure thorough mold removal and minimize the risk of future growth.
Conclusion
In conclusion, basement mold is a common issue that should not be taken lightly. Prompt and effective mold removal is essential to ensure the health and safety of occupants.
DIY mold removal can be suitable for minor cases, but it is important to prioritize safety and follow the recommended guidelines. For extensive mold growth or more complex situations, it is advisable to seek professional mold removal services.
Remember, the key to preventing future mold growth is to control moisture levels and improve ventilation in your basement. Regular inspections and maintenance checks are crucial in identifying and addressing any potential issues promptly.
To learn more about basement waterproofing solutions, you can visit PermaDry Waterproofing.
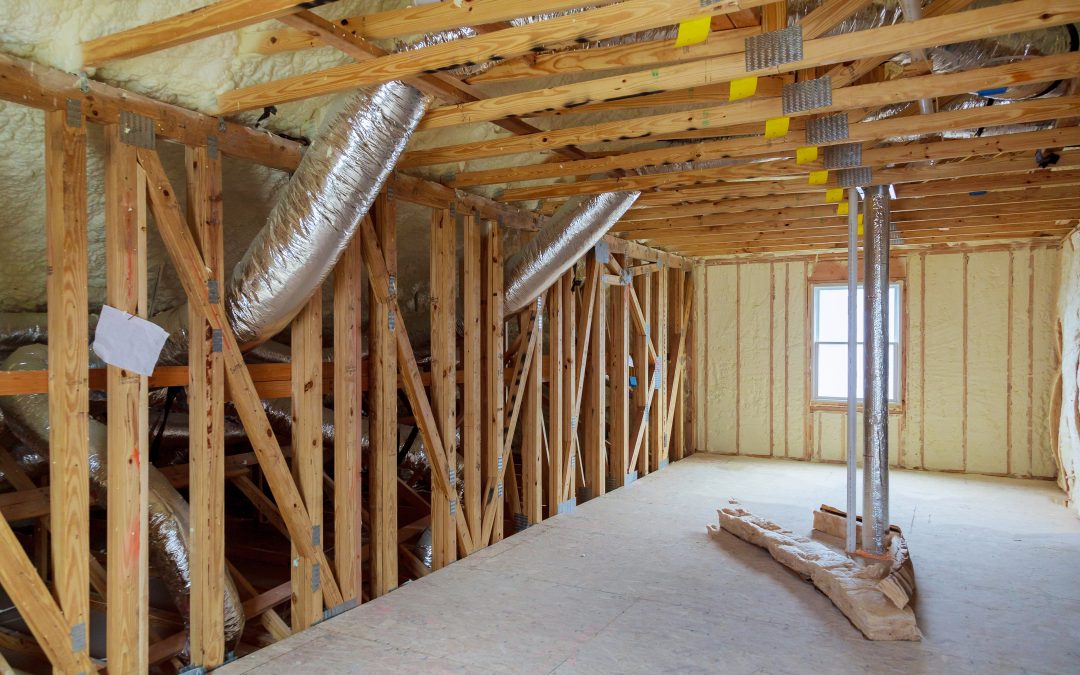
The Importance of Crawl Space Insulation: Energy Efficiency and Beyond
Understanding Crawl Spaces and Insulation
A Sweating House Crawlspace— Who Knew?
When it comes to maintaining a comfortable and energy-efficient home, the importance of crawl space insulation is often overlooked. But what exactly are crawl spaces, and why is insulation necessary? In this article, we will uncover the hidden world beneath our homes and explore the myriad benefits of insulating these often neglected areas.
Definition and Purpose of Crawl Spaces
Crawl spaces are typically found in houses with elevations that are too low for a traditional basement but not high enough for a full basement. These spaces serve several crucial purposes, including providing access to utilities such as plumbing and electrical systems, as well as additional storage areas. Additionally, crawl spaces allow for proper ventilation in the home, preventing moisture buildup and encouraging air circulation.
The Role of Insulation in Crawl Spaces
Insulating crawl spaces is vital for maintaining a comfortable indoor environment and improving energy efficiency. By insulating these areas, homeowners can prevent air leakage, reduce the transfer of heat and cold, and protect their homes from moisture-related issues.
Common Issues in Uninsulated Crawl Spaces
Uninsulated crawl spaces can lead to a multitude of problems. One of the most significant concerns is moisture accumulation, which can result in mold growth, wood rot, and structural damage. Additionally, uninsulated crawl spaces can lead to energy waste, as heat can escape in the winter and infiltrate in the summer, affecting the overall efficiency of the home’s HVAC system.
Energy Efficiency Benefits of Crawl Space Insulation
Now that we understand the importance of crawl space insulation, let’s explore how it can lead to significant energy efficiency benefits for homeowners.
Impact on Heating and Cooling Costs
Insulating crawl spaces can help reduce heating and cooling costs throughout the year. During the winter months, insulated crawl spaces prevent heat loss by creating a barrier between the cold ground and the living area above. Conversely, in the summer, insulation helps prevent heat gain, keeping the home cooler and reducing the workload on the air conditioning system.
Insulating your crawl space can make a substantial difference in energy savings, making it more comfortable and cost-effective to heat and cool your home.
Increased HVAC System Efficiency
When crawl spaces are insulated, the strain on the heating and cooling equipment is greatly reduced. By preventing temperature fluctuations and minimizing air leakage, the HVAC system can operate more efficiently and effectively. This increased efficiency not only saves energy but also leads to a longer lifespan for the HVAC system, reducing maintenance and replacement costs in the long run.
Potential Energy Rebates and Savings
Investing in crawl space insulation may also make homeowners eligible for energy rebates and savings. Various government and utility programs offer incentives for improving energy efficiency, including crawl space insulation. By taking advantage of these incentives, homeowners can reduce the upfront cost of insulation and enjoy long-term savings on energy bills.
If you’re interested in learning more about crawl space insulation and the potential savings it can provide, consider consulting with a professional insulation contractor like PermaDry Waterproofing. Their experienced team can assess the unique needs of your home and provide tailored solutions for improved energy efficiency.
Additional Benefits and Considerations
While energy efficiency is a primary consideration, there are additional benefits and considerations to be aware of when insulating crawl spaces.
Moisture Control and Mold Prevention
Crawl spaces are particularly prone to moisture infiltration, which can lead to mold growth and compromise indoor air quality. Insulating these areas with moisture-resistant materials can help create a barrier against moisture and prevent mold formation. By controlling moisture, homeowners can protect their homes from damage and improve the overall health and wellbeing of their occupants.
Enhanced Indoor Air Quality
Properly insulating crawl spaces can play a significant role in improving indoor air quality. By reducing drafts, air leaks, and moisture ingress, insulation helps minimize the entry of allergens, pollutants, and contaminants into the living space. This, in turn, leads to cleaner and healthier air for the inhabitants, particularly those with respiratory conditions or sensitivities.
Structural Integrity and Pest Deterrence
Insulation not only protects against energy waste and moisture but also helps preserve the structural integrity of the home. By providing a barrier against wood rot and decay, insulation safeguards the crawl space’s structural components and prevents potential damage. Additionally, a well-insulated crawl space can act as a deterrent for pests, such as rodents and insects, providing an added layer of protection for your home.
Types and Options for Crawl Space Insulation
When considering crawl space insulation, there are several types and options available. Each has its own characteristics and installation requirements, so it’s essential to choose the one that best suits your specific needs and budget.
Insulation Materials Suitable for Crawl Spaces
Fiberglass insulation, spray foam insulation, and rigid foam insulation are the most common materials used for crawl space insulation. Each material offers different benefits, such as high R-values, moisture resistance, and ease of installation. Consulting with insulation professionals can help you determine which material is best suited for your crawl space.
Installation Methods and Best Practices
Proper installation is essential for effective crawl space insulation. This includes sealing air leaks, preventing drafts, and ensuring the insulation materials are correctly placed and secured. Additionally, moisture management strategies, such as installing vapor barriers and proper drainage systems, should be implemented to prevent moisture buildup and subsequent issues.
Hiring Professionals vs. DIY Installation
While some may attempt DIY crawl space insulation, it is often advisable to hire experienced professionals. Insulation contractors have the knowledge, expertise, and equipment to ensure proper installation and maximize the benefits of insulation. They can also help navigate any potential challenges and provide long-lasting solutions for optimal energy efficiency.
Conclusion
A Possible Solution In Your Own Backyard
When it comes to creating a comfortable, energy-efficient home, crawl space insulation plays a vital role. By addressing common issues, improving energy efficiency, and providing additional benefits, crawl space insulation can significantly impact the overall comfort, sustainability, and longevity of your home.
Invest in Your Home’s Future
If you’re ready to unleash the true potential of your crawl space and reap the benefits of insulation, consider consulting with professionals like PermaDry Waterproofing. With their expertise and specialized solutions, you can transform your crawl space into a well-insulated, moisture-free area that enhances energy efficiency, indoor air quality, and overall home comfort.
Don’t let your crawl space remain an afterthought. Take action today and give your home the insulation it deserves!
Foundation Repair Costs: What to Expect and How to Save
When it comes to maintaining a sturdy foundation for your home, understanding foundation repair costs is essential. Foundations are subject to various factors that can cause damage over time, such as soil settlement, moisture intrusion, and structural issues. If left unaddressed, these problems can lead to significant foundation damage and affect the overall structural integrity of your home.
Factors influencing foundation repair costs
Several factors influence the cost of foundation repair. These include:
- Type and severity of foundation damage: The extent and type of foundation damage play a significant role in determining the repair costs. Minor cracks and settling may require simple fixes, while major structural issues may require more extensive repairs.
- Size and complexity of the foundation: Larger homes with complex foundation designs may require more labor and materials, increasing the overall repair costs.
- Accessibility and location of the foundation: Foundations that are challenging to access due to landscaping, structures, or tight spaces may require additional equipment or specialized techniques, contributing to higher costs.
- Local labor and material costs: Prices for foundation repair can vary depending on the region’s labor rates and the cost of materials in your area.
Now that we’ve explored the factors influencing foundation repair costs, let’s discuss common repair methods and associated costs.
Common foundation repair methods and associated costs
There are various methods of repairing a foundation, each with its own benefits and associated costs. The three most common methods are slabjacking, piering, and underpinning.
- Slabjacking: Slabjacking, also known as mudjacking, involves injecting a mixture of cement, soil, and sand beneath a concrete slab to lift it back into its original position. This method is commonly used for concrete slabs and can be an effective and cost-efficient solution.
- Slabjacking offers several benefits, including restoring the levelness of the slab, improving drainage, and preventing further settling. The average cost of slabjacking ranges from $500 to $1500, depending on the size and complexity of the foundation.
- It’s important to consider that different types of foundations may have specific considerations when opting for slabjacking as a repair method.
- Piering: Piering involves installing steel or concrete piers beneath the foundation to provide additional support and stability. This method is often used for homes with deep foundation systems or problematic soil conditions.
- Piering can help correct foundation settlement and prevent further damage. The average cost of piering ranges from $1000 to $3000 per pier, depending on the depth and number of piers required. Similarly, different types of foundations may need specific considerations for piering.
- Underpinning: Underpinning involves strengthening the foundation by adding additional support, such as concrete footings or beams, below the existing foundation. This method is often used for homes with significant foundation settlement or structural issues.
- Underpinning provides long-lasting stability and is an effective solution for severe foundation problems. The average cost of underpinning ranges from $1000 to $2500 per linear foot, depending on the extent of the underpinning required and the complexity of the foundation design.
In addition to these repair costs, there are other expenses to consider when tackling foundation repairs:
Additional costs to consider
- Structural engineer consultation: Before undertaking any foundation repair, it is often necessary to consult with a structural engineer to assess the severity of the damage and recommend the appropriate repair method. This consultation can cost anywhere from $300 to $1500, depending on the complexity of the project.
- Permits and inspections: Depending on your local regulations, you may need to obtain permits and undergo inspections during the foundation repair process. These costs can vary but typically range from $100 to $500.
- Temporary accommodations, if necessary: In some cases, extensive foundation repairs may require you to temporarily vacate your home or make alternative living arrangements. The cost of accommodation during this period should be factored into your overall budget.
- Landscape restoration: Foundation repairs often require excavation around the foundation, which may impact your landscaping. Budgeting for landscape restoration can help you maintain the aesthetics of your outdoor space once the repairs are complete.
Now that we have a better understanding of foundation repair costs, let’s explore some tips on how to save on these expenses.
How to Save on Foundation Repair Costs
While foundation repairs can be a significant investment, there are ways to minimize costs without compromising the quality of the repairs. Here are some strategies to consider:
- Regular maintenance and inspection: Implementing a proactive approach to foundation maintenance can help identify and address issues before they escalate into costly repairs. Simple measures like maintaining proper drainage, monitoring moisture levels, and addressing minor cracks promptly can prevent more extensive damage and save on repair costs.
- Comparing quotes from multiple contractors: It’s crucial to obtain multiple quotes from reputable contractors to ensure you are getting a fair price. Researching and selecting contractors with a proven track record can provide peace of mind regarding the quality of their work. Requesting detailed written quotes that outline the scope of work, materials used, and project timeline will allow for accurate comparisons.
- Exploring financing and insurance options: Homeowner’s insurance may provide coverage for foundation repair if the damage is caused by a covered peril. It’s worth reviewing your insurance policy to understand the extent of the coverage. Additionally, various financing programs and loans are available to assist homeowners in managing the cost of foundation repairs. Some government assistance and grant programs may also be available for eligible homeowners.
- Considering alternative solutions and materials: Innovative repair techniques and cost-saving alternatives to traditional methods may be worth exploring. Technology advancements have introduced new approaches to foundation repairs, such as chemical grouting or carbon fiber reinforcement, which can provide cost-effective solutions with long-term benefits.
- Ongoing maintenance and preventative measures: Once the foundation repairs are complete, implementing proper drainage and landscaping techniques, as well as investing in foundation watering systems and moisture control, can help maintain the stability and integrity of your foundation over time. Regular inspections and timely repairs of minor issues can prevent costly future repairs.
Hiring professionals for foundation repairs is crucial to ensure the job is done properly and efficiently. Let’s delve into important considerations when selecting a contractor.
Hiring Professionals for Foundation Repair
The expertise and experience of the contractor you choose play a vital role in the success of your foundation repair. Here are some key factors to consider when hiring professionals:
- Importance of choosing a reliable and experienced contractor: Verify the contractor’s licenses, certifications, and insurance coverage to ensure they meet the necessary requirements for conducting foundation repairs. Additionally, review company reviews and customer feedback to gauge their reputation and reliability.
- Questions to ask potential contractors: Prepare a list of questions to ask potential contractors during the selection process. Inquire about their years of experience in foundation repair, whether they are familiar with local building codes and regulations, the warranty offerings, and the required timeline for project completion.
- Understanding the contract and terms: Before signing any contract, carefully review the terms and conditions. Ensure a detailed scope of work and materials used is provided in writing. Assess the payment schedule and inquire about financing options. Familiarize yourself with dispute resolution and cancellation clauses. Additionally, discuss any additional guarantees or promises made during the negotiation process.
- Communicating effectively with the contractor: Establish clear expectations and goals for the project, and maintain open lines of communication throughout the repair process. Address any concerns or changes promptly to ensure a smooth and satisfactory experience.
- Conducting a final inspection and ensuring satisfaction: Once the foundation repair is complete, conduct a comprehensive walk-through with the contractor to assess the quality of the work. Address any outstanding issues or questions at this time. Obtain necessary documentation, such as warranties or guarantees, before finalizing the project.
By following these guidelines, you can make informed decisions about foundation repair costs, saving money without compromising the safety and stability of your home. Remember, it is always better to address foundation issues promptly and consult with professionals who can provide expert guidance tailored to your specific needs.
Common Causes of Foundation Leaks and How to Prevent Them
As a true southern gentleman, I find it incredibly important to understand the foundation of things, both figuratively and quite literally. When it comes to our homes, the foundation plays a critical role in ensuring the structural integrity and longevity of the building. However, one common issue that can undermine the strength of the foundation is the presence of leaks. In this article, we will delve into the world of foundation leaks, exploring their causes, signs, and most importantly, how to prevent them.
Understanding Foundation Leaks
Before we dive into the causes and prevention of foundation leaks, let’s first establish the significance of a solid foundation. Just like a true southern gentleman, a sturdy foundation provides the necessary support and stability for our homes. It ensures that our houses can withstand the test of time and the unpredictable forces of nature.
Foundation leaks, on the other hand, can wreak havoc on this stability. Leaks occur when unwanted water finds its way into the foundation, leading to a range of problems. From weakened structural components to mold growth and compromised indoor air quality, the impact of foundation leaks can be far-reaching.
Recognizing the signs of foundation leaks is crucial for early detection and prevention. Some common indicators include cracks in the foundation walls, shifting or sinking floors, doors and windows that are difficult to open or close, and moisture or mold growth in the basement or crawl space. If you notice any of these signs, it’s imperative to take action promptly to avoid further damage.
Common Causes of Foundation Leaks
Now that we understand the importance of a solid foundation and the consequences of leaks, let’s explore the common causes behind these troublesome issues.
Poor construction practices can be a major contributing factor. When substandard materials are used or when there is inadequate foundation design, the chances of leaks occurring increase significantly. It’s essential to ensure that your home’s foundation has been built using high-quality materials and proper architectural specifications.
Water accumulation and drainage issues are also prevalent triggers for foundation leaks. Improper grading around the foundation can lead to water pooling, putting undue pressure on the structure. Similarly, insufficient or clogged gutter systems can result in water overflowing and seeping into the foundation. Maintaining proper surface water management is, therefore, essential to protect the foundation.
Plumbing and sewer line problems can also contribute to foundation leaks. Leaky pipes and fittings within the property can introduce water into the foundation, causing damage over time. Additionally, faulty sewer line connections can lead to wastewater leaking into the surrounding soil, which can affect the stability of the foundation. Regular inspections and maintenance of the plumbing system are crucial to prevent these issues.
Another soil-related factor that can lead to foundation leaks is the presence of expansive soil. This type of soil, commonly found in certain regions, expands when exposed to moisture and contracts when it dries. This movement can exert pressure on the foundation, potentially causing cracks and leaks. Additionally, poor soil compaction during construction can also contribute to foundation issues. Measures such as soil stabilization techniques and proper moisture management can help mitigate these risks.
Preventing Foundation Leaks
Now that we understand the causes of foundation leaks, let’s discuss some effective preventive measures that you can implement to safeguard your home.
Regular maintenance and inspection play a vital role in preventing foundation leaks. Conduct visual checks around your property to identify any early signs of leaks, such as cracks or moisture. Additionally, scheduling professional inspections on a periodic basis can help detect any potential issues before they escalate.
Proper surface water management is crucial for protecting the foundation. Ensure that the grading around your home slopes away from the foundation, allowing water to naturally flow away from the structure. It’s also important to install and maintain effective gutter systems to channel rainwater away from the foundation. This helps to minimize the risk of water accumulation and damage.
Keeping your plumbing system in good condition is another essential step in preventing foundation leaks. Regularly inspect your pipes and fittings for any leaks or signs of damage. Promptly address any issues to prevent water from seeping into the foundation. Additionally, proper maintenance of sewage lines and connections is necessary to avoid wastewater leaks that can affect the stability of the foundation.
Addressing soil-related issues is also crucial in preventing foundation leaks. Implementing proper soil stabilization techniques, such as using retaining walls or piers, can help mitigate the impact of expansive soil. Additionally, managing soil moisture through proper watering and drainage practices can also contribute to overall foundation health.
Seeking Professional Help
While preventive measures are essential, it’s also important to seek professional assistance when dealing with foundation leaks. Consulting foundation experts can provide valuable insights and guidance tailored to your specific situation. Reputable waterproofing and foundation repair companies can assess the extent of the damage and offer effective solutions to address the issue.
When choosing a foundation repair company, it’s important to conduct research and obtain multiple estimates. This allows you to make an informed decision and ensures that you hire a company that has the expertise and experience necessary to tackle the leak and repair the foundation effectively.
Remember, quick action is vital if you detect any signs of foundation leaks. The longer you wait, the more extensive the damage can become, potentially leading to costly repairs and even compromising the safety of your home.
Conclusion
In conclusion, understanding foundation leaks and taking proactive measures to prevent them are essential for maintaining the integrity of your home. By recognizing the signs, addressing the causes, and implementing preventive measures, you can protect your investment and enjoy a solid foundation for years to come. So, like a true southern gentleman, be vigilant, take action, and ensure that your home stands strong against the test of time.
For more information on foundation leak and crack repair, you can visit PermaDry Waterproofing.

Signs Your Home Needs Urgent Foundation Crack Repair
Understanding Foundation Cracks
An Introduction to Foundation Cracks and Their Importance
As a homeowner, it is crucial to have a solid foundation for your house. The foundation serves as the base on which your entire home rests upon, providing stability and structural integrity. However, over time, foundation cracks can occur due to various factors, such as soil movement, hydrostatic pressure, and poor construction practices.
Different Types of Foundation Cracks
Foundation cracks can manifest in different ways, each indicating a specific issue. Understanding the types of cracks can help you identify potential problems.
- Vertical cracks: These cracks run vertically from the top to the bottom of the foundation walls and are typically caused by normal settling of the house.
- Horizontal cracks: Horizontal cracks are a more serious concern as they can signify structural issues and should be addressed promptly.
- Diagonal cracks: Diagonal cracks often indicate issues with the foundation’s structural integrity and can be caused by soil movement or improper drainage.
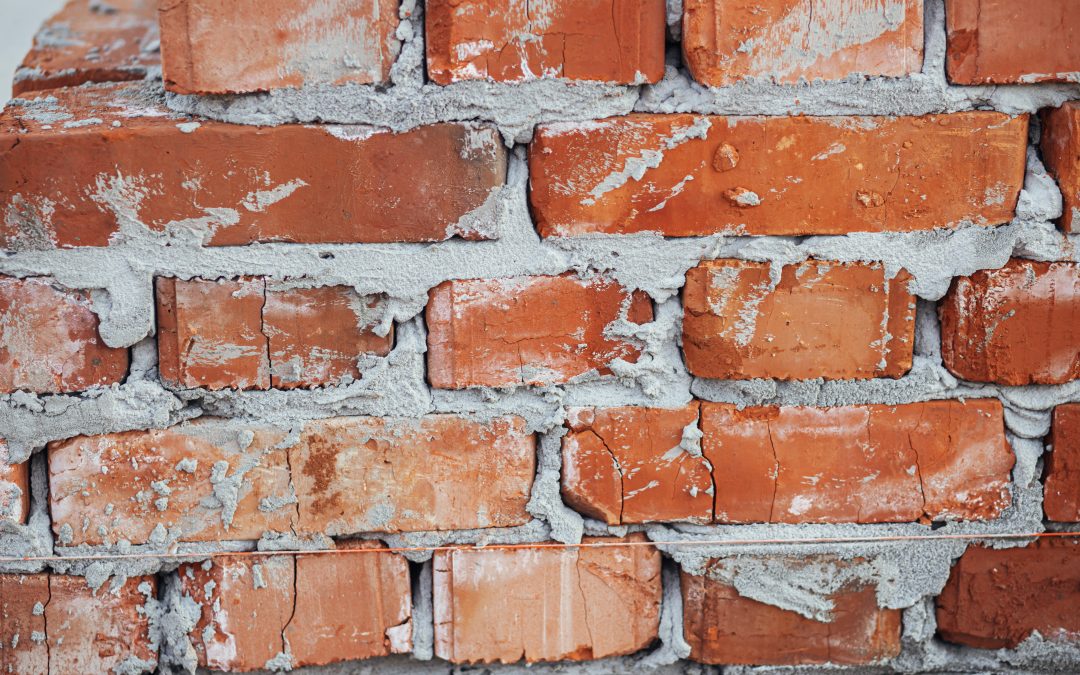
- Stair-step cracks: These cracks often occur in brick or masonry foundations and are characterized by a pattern resembling a flight of stairs. They suggest a shifting foundation and require professional attention.
Factors Contributing to Foundation Cracks
Several factors can contribute to the development of foundation cracks. It’s essential to understand these factors to prevent or address the underlying issues.
- Soil movement and settlement: Expansive soils, which shrink and expand with moisture changes, can exert pressure on the foundation, causing cracks.
- Hydrostatic pressure: Excessive water pressure around the foundation can lead to cracks, especially if the drainage system is inadequate.
- Poor construction practices: Improperly reinforced or poorly constructed foundations are more prone to cracking.
- Tree roots: Tree roots can grow near or beneath the foundation, exerting pressure and causing cracks.
Indications of Foundation Cracks
It’s important to be able to identify the signs of foundation cracks as early detection can prevent further damage and potentially expensive repairs.
Exterior Signs
When inspecting the exterior of your home, keep an eye out for the following signs:
- Visible cracks in the foundation: Cracks that are visible on the outside of the foundation walls are an obvious indication of potential issues.
- Separation of bricks or masonry: If you notice gaps or separation between bricks or masonry, it could be a sign of foundation movement.
- Gaps around windows and doors: Uneven gaps between windows or doors and their frames may indicate foundation settlement.
- Uneven or sinking landscape: If your yard or landscape is uneven or sinking, it could be due to foundation problems.
Interior Signs
Pay attention to the following interior signs that may indicate foundation cracks:
- Cracks in walls and ceilings: Cracks that appear in your interior walls or ceilings can be a sign of foundation issues.
- Doors and windows sticking or not closing properly: If your doors or windows are suddenly harder to open or close, it could be due to a shifting foundation.
- Uneven or sagging floors: Floors that slope or sag in certain areas can indicate foundation settlement.
- Water leakage or dampness in the basement: If you observe water leakage or dampness in the basement, it may be a sign of foundation cracks allowing water entry.
Upon noticing any of these signs, it is crucial to take immediate action to address the foundation cracks effectively.
Urgent Foundation Crack Repairs
Timely repairs for foundation cracks are essential to prevent further damage and maintain the structural integrity of your home. Waiting too long can result in more significant problems that require costly repairs in the future.
The Importance of Timely Repairs
Repairing foundation cracks promptly offers several benefits:
- Preventing further damage: Addressing cracks early on can prevent them from spreading and causing more extensive issues.
- Preserving structural integrity: Stabilizing the foundation can help maintain the overall structural integrity of your home.
- Avoiding costly repairs in the future: Small cracks can be repaired relatively easily and cost-effectively if caught early. Ignoring them may lead to more significant problems that require extensive repairs.
DIY vs. Professional Repairs
When it comes to foundation crack repairs, it’s important to consider whether to tackle the repairs yourself or hire a professional.
Risks of DIY Repairs
While DIY repairs may seem cost-effective, they come with risks:
- Improper diagnosis and inadequate repairs can lead to continued foundation movement and recurring cracks.
- Limited knowledge and lack of experience may result in ineffective repairs that don’t address the underlying cause of the cracks.
- Inadequately addressing foundation issues can negatively impact the resale value of your home.
Benefits of Professional Expertise
Engaging the services of a professional foundation repair contractor offers numerous advantages:
- Experienced professionals can accurately diagnose the cause of the cracks and provide effective, long-lasting solutions.
- They have access to specialized equipment and materials required for foundation repairs.
- Professional repairs often come with warranties, providing peace of mind.
It’s always recommended to consult with a reputable foundation repair contractor to ensure your foundation cracks are addressed correctly.
Methods of Foundation Crack Repair
Foundation crack repair methods vary depending on the severity and cause of the cracks. Some common methods include:
- Epoxy or polyurethane injections: These materials are injected into the cracks to fill and seal them, preventing water infiltration and further movement.
- Carbon fiber strips or steel reinforcements: These materials provide additional structural support, reinforcing the foundation walls and preventing further cracking.
- Underpinning or piering techniques: In severe cases, underpinning involves strengthening the foundation by installing additional supports or piers beneath the existing foundation.
Depending on the specifics of your foundation cracks, a professional contractor will determine the most suitable method for repair.
Hiring a Reputable Foundation Repair Contractor
When choosing a foundation repair contractor, follow these important steps:
- Research and gather referrals: Seek recommendations from friends, family, or trusted professionals and research online reviews and ratings.
- Check for proper licensing and insurance: Ensure the contractor has the necessary licenses and insurance to protect you and your property.
- Ask for written estimates and warranties: Obtain written estimates detailing the scope of work and associated costs. Additionally, inquire about any warranties offered on the repairs.
Choosing a reputable foundation repair contractor is crucial in ensuring the quality and effectiveness of the repairs performed on your foundation.
Maintaining a Solid Foundation
Once your foundation cracks have been addressed, it’s important to implement proper maintenance practices to keep your foundation strong and stable.
Regular Inspection and Maintenance
Regularly inspecting your foundation and implementing maintenance measures is key to preventing future issues:
- Monitoring foundation cracks: Check for any new cracks or changes in existing cracks and address them promptly.
- Managing water drainage around the house: Ensure that your gutters, downspouts, and drainage systems are functioning correctly to direct water away from the foundation.
- Maintaining consistent soil moisture levels: Properly managing soil moisture helps prevent excessive expansion and contraction, minimizing stress on the foundation.
Addressing Issues Promptly
Regularly scheduled foundation inspections are essential. Address minor issues before they escalate into more significant problems that require costly repairs.
Considering Preventative Measures
Implementing the following preventative measures can help protect your foundation:
- Installing proper drainage systems: Ensuring adequate drainage around the perimeter of your home helps prevent water buildup that can lead to foundation issues.
- Implementing foundation waterproofing techniques: Applying waterproofing solutions to the exterior and interior of your foundation walls can help protect against moisture intrusion.
- Ensuring appropriate soil compaction during construction: Proper soil compaction during construction provides a stable base for your foundation.
By taking proactive measures, you can maintain a solid foundation and minimize the likelihood of future cracks or structural problems.
Conclusion
In conclusion, understanding the importance of a solid foundation and being able to identify and address foundation cracks is crucial for homeowners. Foundation cracks can result from various factors, including soil movement, hydrostatic pressure, poor construction practices, and tree roots.
Recognizing the indications of foundation cracks, both externally and internally, can help you take timely action to prevent further damage. Urgent repairs are essential to preserve the structural integrity of your home and avoid costly repairs in the future.
When it comes to foundation crack repairs, it is often best to consult with a professional contractor who has the necessary expertise and equipment to address the issues effectively. They can determine the most suitable repair methods, such as epoxy injections, carbon fiber strips, or underpinning techniques.
Maintaining a solid foundation involves regular inspections, proper maintenance, and preventative measures. It’s important to monitor foundation cracks, manage water drainage, and address issues promptly to prevent further damage. Considering professional assistance and implementing preventative measures can help protect your foundation in the long run.
Remember, a solid foundation is the key to a stable and secure home.
For more information on foundation crack repair and maintenance, visit here.
Get in Touch
(206) 309-5147
Contact Us
Open Hours
7:30am - 5pm Weekdays
Closed Weekends
Our Office
608 SW 12th Street
Renton, WA 98057
Email Us